There have been many articles on how to scan film, but most of these focus solely on scan settings and not the entire workflow. Because of this, it has taken me years to develop an efficient photo scanning process from start to finish. And, like my photography style, it’s constantly changing to become more efficient. I'd like to share my methods and how I process my images.
SCANNING:
First off, make sure that you are capturing the maximum amount of dynamic range. While it’s tempting to achieve that print ready image in your scanning software, leave the finishing work for a photo editing program that will give you the most control. You want to capture as much detail in the highlights and shadows as your scanner will allow. This enables you to work with the maximum amount of data.
The other consideration is to use an optimal scan resolution. Scan only as large as you plan on printing or displaying. Hard drive space is cheap, but can start disappearing quickly with larger format film. Also, make sure to set your default scan file destination to a drive with sufficient free space. I use a solid state drive for my operating system, which provides better performance, but is more expensive per gigabyte. So instead of scanning to my C: drive, I scan directly to my larger storage drive to keep the primary disc from filling up.
Don’t worry about white balance too much by the way. You’ll always be able to adjust this easier later.
RENAMING:
Now that you have an entire trip’s negatives captured on your computer, you need to start organizing the files. Hopefully you scanned them in some type of order. Either way, I recommend separating your files into smaller chunks. For trips, I create a folder for each area I visit. These locations are then sorted under the calendar year to allow for quick access. I've found it much more efficient to organize by date and not location. To combine similar subjects, I utilize collections in Lightroom and the metadata tagging system.
2016
2017
2017-09-02-S Secluded Lake COT Wind River WY (FOLDER NAMING)
20170903_secludedlake_001 (FILE NAMING)
20170903_secludedlake_002
20170903_secludedlake_003
Once you get the files organized a bit, start renaming. Renaming the raw scans will make post processing and sharing much easier since file names are retained downstream. I stick to a basic When_Where_Sequence# format (see above). This is just what I use, but as always, do what works best for you. A little tip to reduce the headache of renaming lots of files, use a batch file renaming tool. I use a free program called FileRenamer, which allows me to rename hundreds of files in seconds.
BACK-UP:
After waiting on your scanner for all that time, you definitely do not want to repeat it in the future. Do it once, and do it right. Now it’s time to back up all the organized, renamed files. People talk a lot about cloud storage but it’s just not for me. I have two internal storage drives in my desktop that I redundantly save my files to. A few times a year, I make a third copy on a drive that I keep in my fireproof box. This makes sure that if any freak electrical issues happen with my computer, there is an ‘offline’ backup. Then, my OCD kicks in…once a year I make a forth copy to a drive that I keep at a family members house. This last step is a carry over from the dreaded digital camera years. In reality, my negatives are the offline back-up.
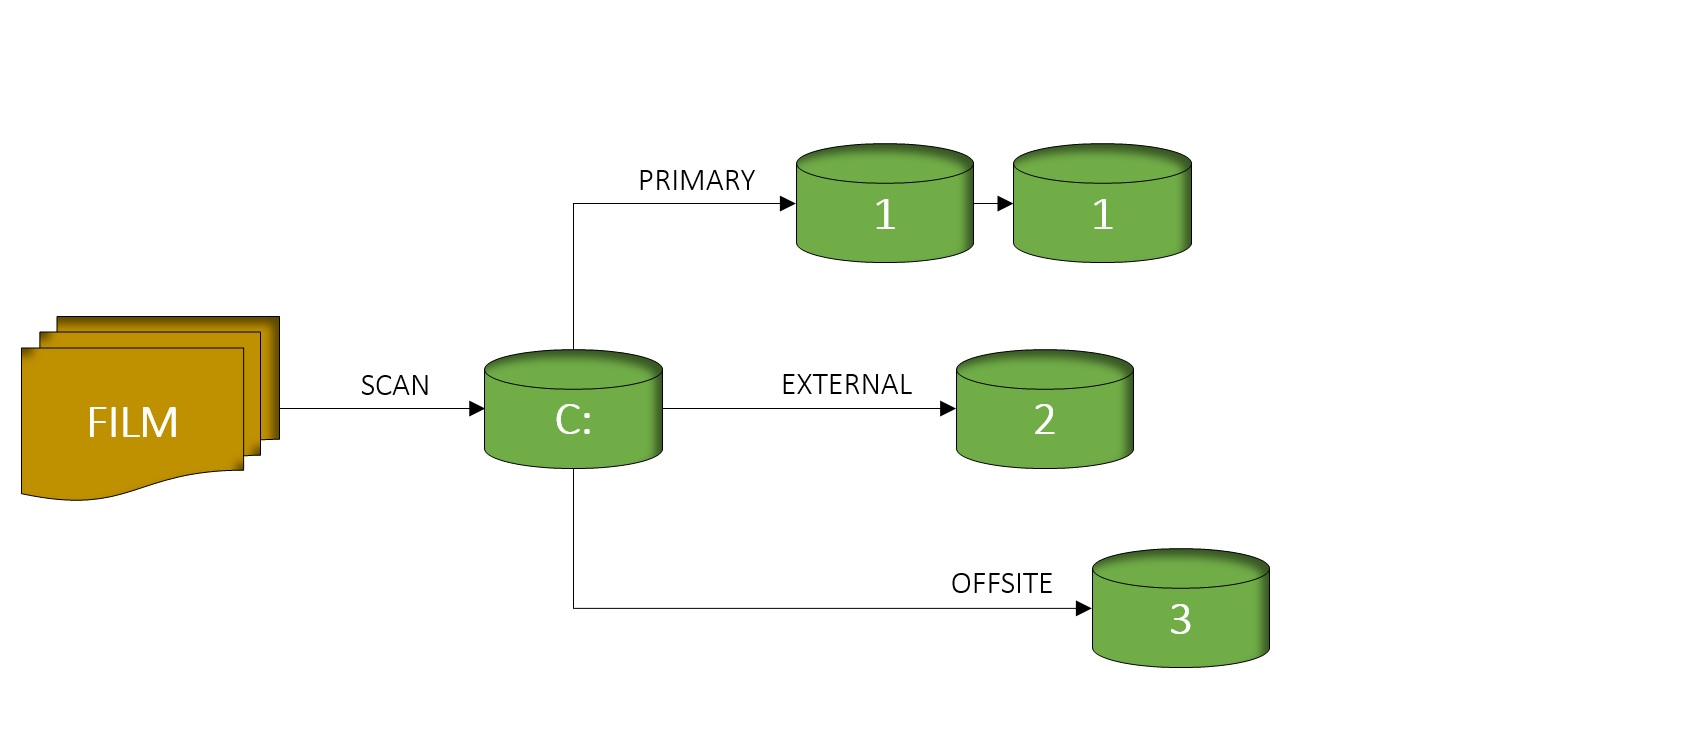
PHOTO EDITOR:
Finally, it's time to edit your negatives. This is where practice makes perfect. Bringing the most out of your film scans is much harder than digital camera files. Differences in film emulations, fixing dust, and adjusting for the proper colors can be tough. The more you practice, the easier it gets. I recommend only exporting JPEGS as needed. If you export all the files, you’re only increasing storage needs. If you have an edit in Lightroom, you can open and export with the required settings whenever you want.
And that’s my photo workflow. It takes a lot of time, but the organization is worth it in the end. I hope you can take a few tips to improve your own workflow.
