Sleeklens is a company based in Copenhagen, Denmark specializing in custom Lightroom and Photoshop presets. In this review, I will be utilizing their "Through the Woods" workflow. Using presets in Lightroom is actually a fairly new method for me. But I was very curious to see how a landscape specific preset package, optimized with digital cameras images, would handle my film scans. Scanning shots on Kodak Ektar can be trying, and a lot of time must be spent getting the colors right in post.

Before & After: Raw Scan from Epson flatbed and preset applied
I started working on two shots from Sedona that I think have a lot of potential, but have gone back and forth on how to extract this in Lightroom. The sunrise on Sugarloaf mountain, in particular, has been tough. Shooting 4x5 Kodak Ektar, I captured a stunning amount of tonal detail without the use of graduated filters. I've tried, on multiple occasions, to process this image, but haven't been happy with the results. I figure this would be a prime candidate to see what Sleeklens could do.
Trying all of the presets in the "Through the Woods" workflow, I found an all-in-one called Love Me Tender that gave the reds a bright pop. But as you can see from the comparison above, the hues were too garish and the clear sky took on an unnatural coloring. I found that the sharpening and saturation needed to be turned down. Also, I used the Sleeklens custom brush "Darken" to tone down the areas that received direct sunlight.
I think this preset got me to a great spot for finishing the photo. This particular negative is off getting drum scanned at the moment, so I'll be trying this same workflow on that file (all 600MB of it). It will provide a much better base image for editing.

Final Image w/Love Me Tender present (after a few tweeks)
My next frame was also, coincidentally, from the same trail in Sedona. Only this time, I had my Nikon F6 pointed towards the sun. Through the Woods has an all-in-one present called Dawn Rising, which looked horrible on the Sugarloaf mountain shot, but worked great with the high-key sunrise. This is a testament to the untapped potential of your shots. You may not like a specific preset with one image, but it may work wonders on other pictures in different lighting conditions. It would take too much time to explore all of these possibilities manually.
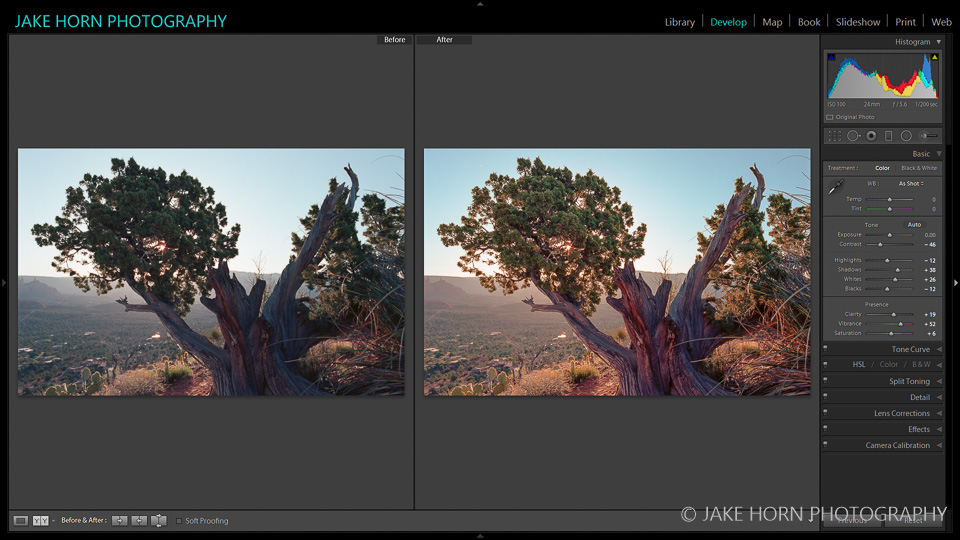
Before & After: Raw Scan and Dawn Rising Preset
While this preset got me 80% of the way there, I needed to fix a few items. First thing was the sharpening, which was way over done (well over 100). While the scan from my EPSON V850 did need a bit a sharpening, the Dawn Rising preset introduced too many artifacts. This was easily reduced with the slider and no adverse effects to the rest of the edits.
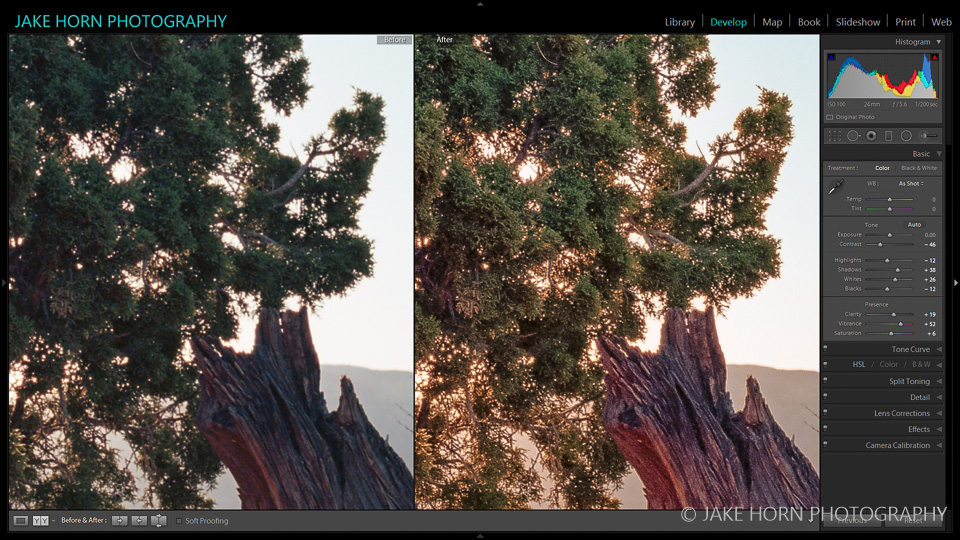
Color and detail looking good, but artifacts from over sharpening present
This next step was to adjust the shaded portions of the tree to add a little warmth. I used the brush Haze-Golden 2 to enhance the sunburst coming through the tree. I love how it instantly blended the top portion of the scene with the dry bushes on the ground.

Sharpening dialed down and enhanced sun-burst
One final tweak was to remove the purple hue in the shadows. This was accomplished by a quick temperature adjustment brush on the tree.
Overall, I am very happy how this one turned out. The last time I worked this photo, I got a result very similar to this, but it took much longer than the five minutes it took with presets.

Final image after warming up the shadows
I was pleasantly surprised how Sleeklens presets allowed me to process two tough images so quickly. However, every image will not need to be processed this way. Landscapes shot on Fuji Velvia come to mind. There is a real value in using these presets to speed up an editing session. If I come back from a trip and have, say, fifteen good shots to process and get printed, I could spend a considerable amount of time in the digital darkroom. Photos executed perfectly in camera are always easy to work in post. Crop the scan, adjust the white balance, and set a few highlight and shadow curves. But there are shots that may have missed the mark in exposure, or maybe not captured in the best light. This is where I see Lightroom presets coming to the rescue. Instead of slowing down my flow on a tough shot, I can try out each preset and jump start the editing process.
If you would like to checkout what Sleeklens has to offer, you can find their full line of presets HERE. If you want to try the same landscape package that I used, you can find that HERE.
DISCLAIMER: Through the Woods was provided by Sleeklens for use in this review.